
Globe SIM Registration – Register Your SIM Card Online
The SIM Registration Act (Republic Act No. 11934) requires all mobile users in the Philippines to register their SIM cards for a safer and more secure digital experience. This regulation applies to every telecom provider, including Globe Telecom. If you have a Globe SIM Card, you can complete the registration process by accessing the official registration portal, providing your personal information, and verifying your identity with a valid ID. Registering your Globe SIM Card helps protect against scams, identity theft, and unauthorized SIM use while ensuring uninterrupted access to calls, text messages, mobile data, and other Globe services.
Key Steps to Register Your Globe SIM
Registering your Globe SIM is quick and easy. Under Republic Act No. 11934, all Globe users in the Philippines must register their SIM cards. Before starting the online registration, make sure you have your personal information and a valid government-issued ID ready.
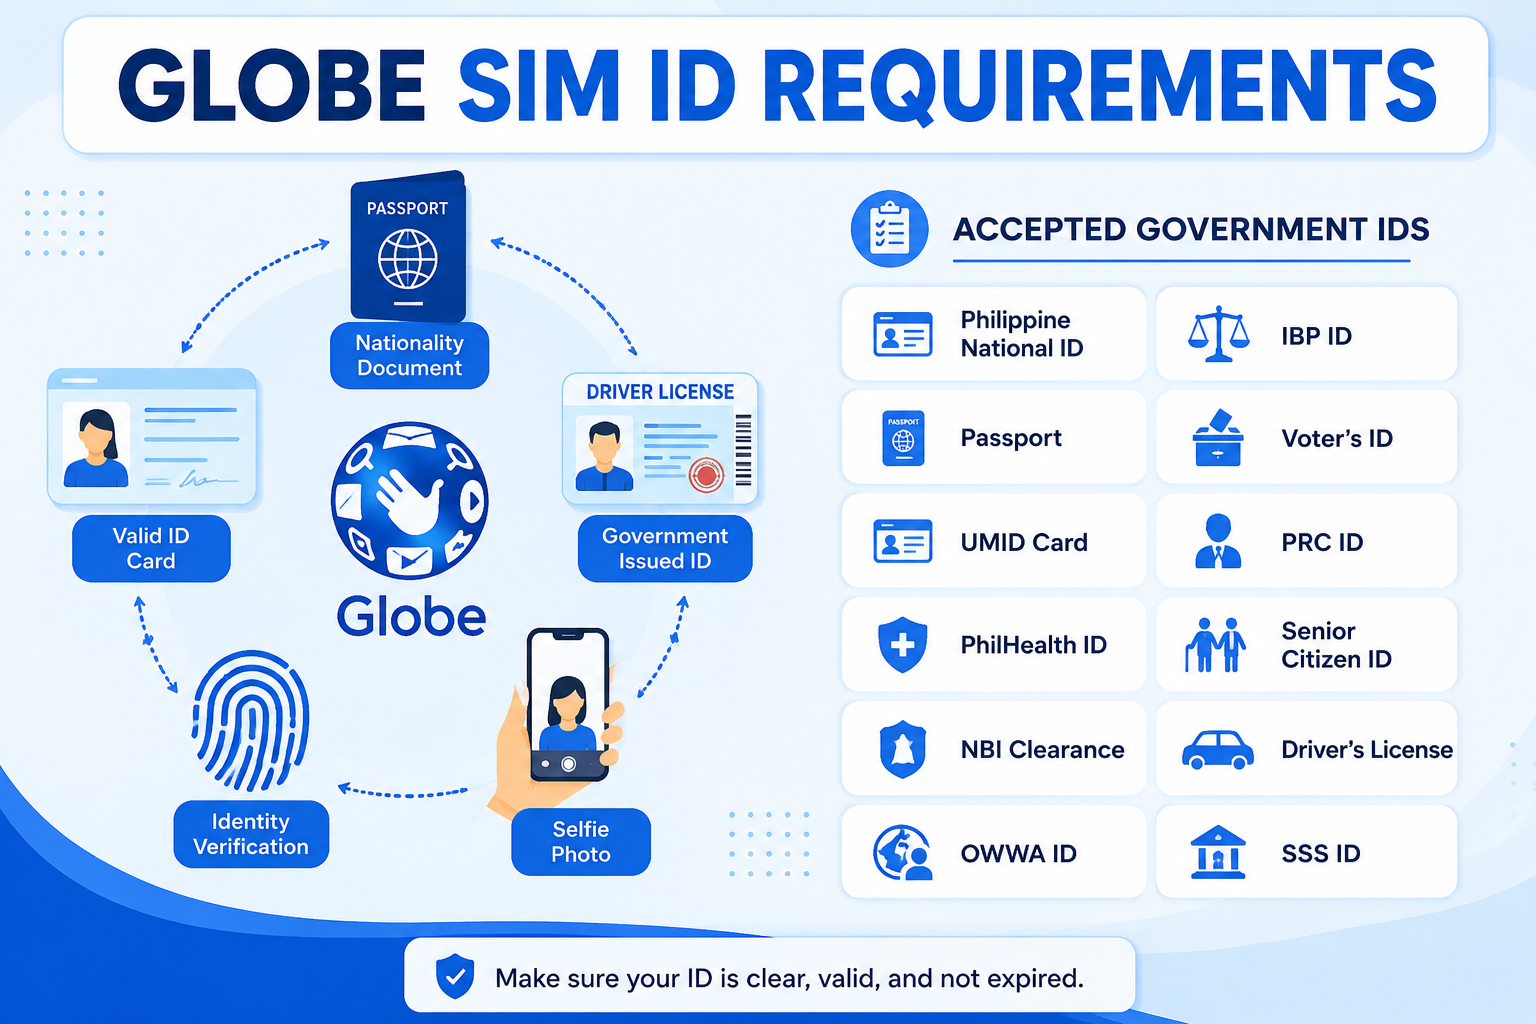
Requirements
- Full Name
- Date of Birth
- Active Globe Mobile Number
- Nationality
- Valid Government-Issued ID
- ID Number
- Recent Selfie Photo
Accepted IDs
- Philippine National ID
- Passport
- Driver’s License
- UMID Card
- PhilHealth ID
- SSS ID
- PRC ID
- Voter’s ID
- Senior Citizen ID
- NBI Clearance
- OWWA ID
- IBP ID
How to Register Your Globe SIM Online (Step-by-Step Guide)
Registering your Globe SIM is a simple and quick process that can be completed online. Follow the steps below to successfully register your Globe SIM card and keep your mobile services active.
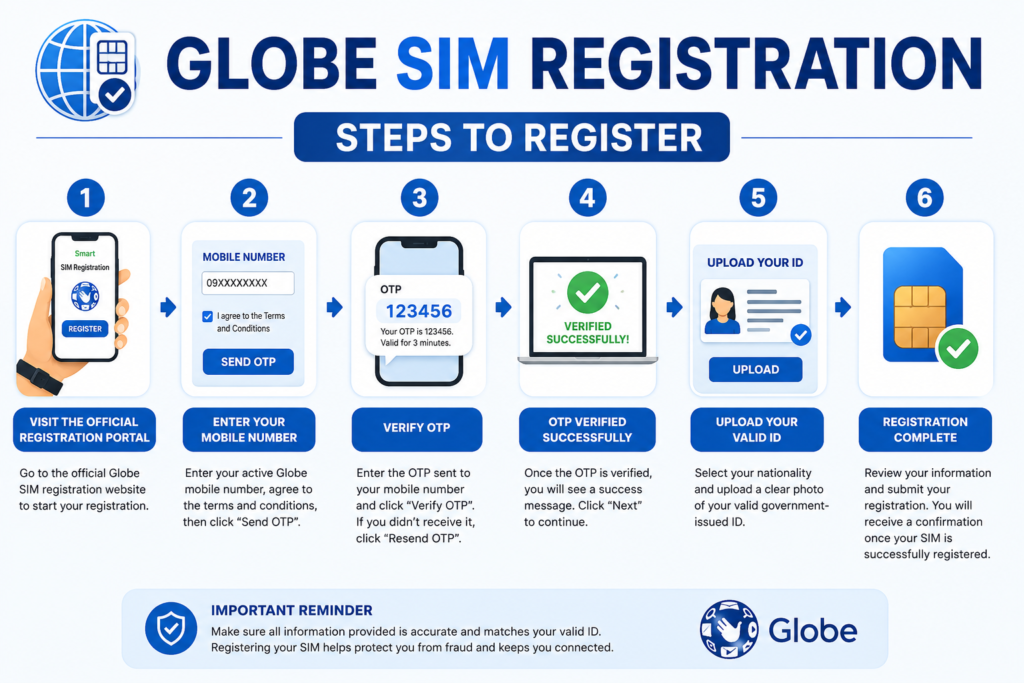
Step 1: Visit the Globe SIM Registration Website
First, open the official Globe SIM Registration website using the provided registration link.
Click on the “Register Now” button to begin the registration process.
Step 2: Enter Your Globe Mobile Number
Enter your active 10-digit Globe mobile number in the registration field.
After entering your number, click the “Register” button to continue.
Step 3: Verify Your Number Through OTP
Globe will send a One-Time Password (OTP) to your registered mobile number.
Check your messages and enter the OTP code within 5 minutes to verify your number.
If you do not receive the OTP immediately, wait for a short time and request a new code.
VERIFY OTP
Once your OTP is successfully verified, you can proceed to complete your personal information.
Step 4: Provide Your Personal Details
Fill out the required registration form with accurate information, including:
- Full Name
- Date of Birth
- Gender
- Nationality
- Complete Address
- Other required personal details
Make sure all information matches your valid identification documents.
ABOUT YOU
Step 5: Upload Your ID and Selfie Verification
To verify your identity, upload:
- A clear photo of your valid government-issued ID
- A recent selfie photo
Click the “Attach” button to upload your files.
Make sure both images are clear and each file is less than 2MB. If your selfie file is too large, compress the image before uploading.
VERIFY YOUR IDENTITY
Step 6: Accept Privacy Notice and Submit
Review your information carefully, then tick the box to agree with Globe’s Privacy Notice.
Finally, click the “Submit” button to complete your Globe SIM registration.
After successful submission, a reference number will appear on your screen.
Save or copy this reference number because it serves as proof of your completed Globe SIM registration.
You can use it later to check your registration status if needed.
Globe SIM Registration Using QR Code
You can also register your Globe SIM by scanning the official QR code using your smartphone.
The QR code will redirect you to the Globe SIM Registration website, where you can follow the on-screen instructions and complete the registration process.
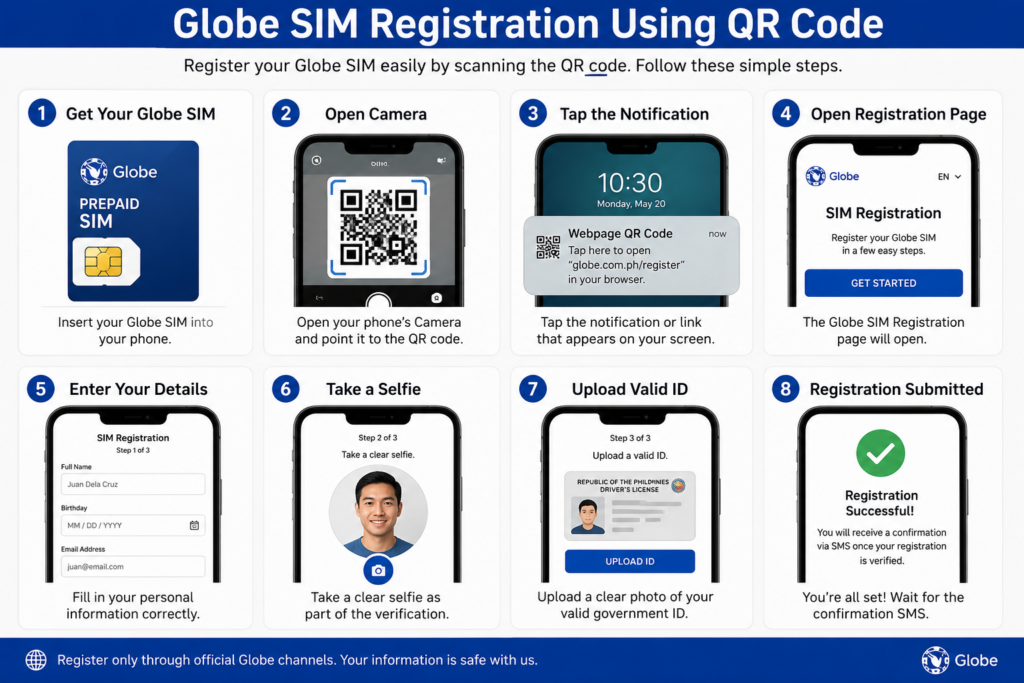
Globe SIM Registration Steps
- Scan the Globe SIM Registration QR code using your mobile phone.
- Open the registration website.
- Enter your Globe mobile number.
- Verify your number using the OTP sent via SMS.
- Complete your personal information.
- Upload your valid ID and selfie.
- Accept the Privacy Notice and submit your registration.
How to Verify Your Globe SIM Registration Status
After completing your Globe SIM registration, you will receive a confirmation message from Globe.
If you want to check your registration status, you can use the following methods:
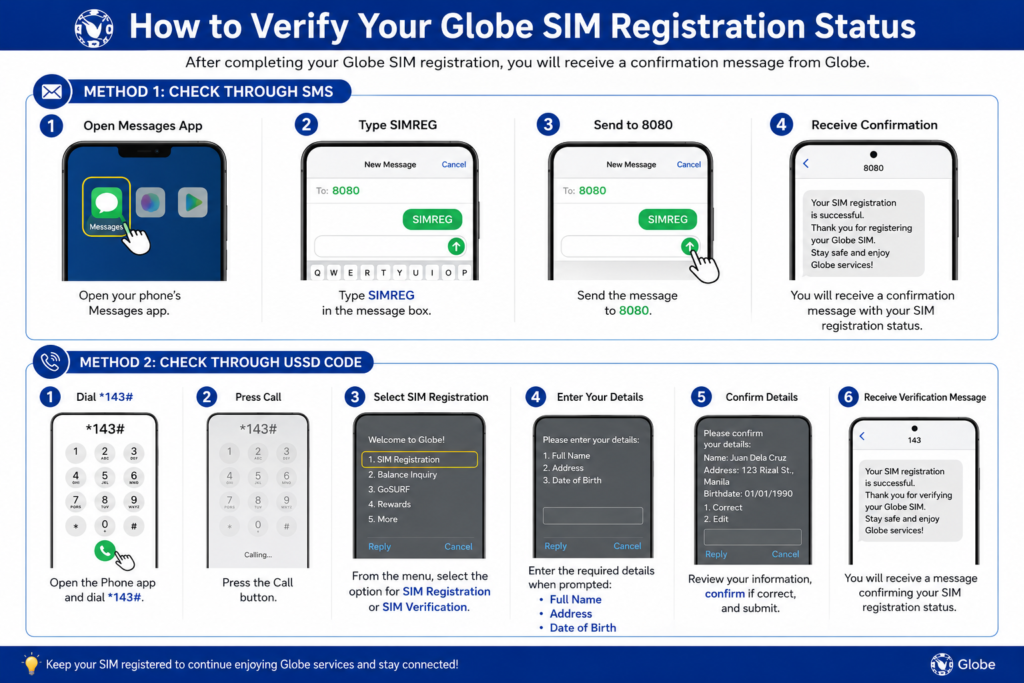
Method 1: Check Through SMS
Open your phone’s messaging app and send:
SIMREG
to:
8080
You will receive a confirmation message showing your SIM registration status.
Method 2: Check Through USSD Code
You can also verify your Globe SIM registration by dialing:
*143#
Press the call button and wait for the options menu to appear.
Look for the option related to SIM Registration or SIM Verification and follow the instructions provided.
You may need to enter some personal details, such as:
- Full Name
- Address
- Date of Birth
After submitting your information, confirm the details and wait for the verification message.
Once your SIM details are successfully verified, Globe will send you a confirmation SMS confirming that your SIM registration is complete.
Globe SIM Registration Using the GlobeOne App
Registering your Globe SIM through the GlobeOne app is a simple and convenient process. Follow these steps to complete your SIM registration using your Android or iPhone.

Step 1: Open the GlobeOne App
First, open the GlobeOne app on your smartphone. From the Home section, find and select the “Register Your SIM” option to begin the registration process.
Step 2: Enter Your Globe Mobile Number
Enter your active Globe mobile number and tap the “Register SIM” button. A one-time password (OTP) will be sent to your number through SMS for verification.
Step 3: Verify Your Number Through OTP
Check your messages and enter the OTP code in the provided field. Once the code is verified, tap “Let’s Start” to continue with the Globe SIM registration process.
Step 4: Provide Your Personal Information
Complete the registration form by entering your required personal details. Make sure all information matches your valid identification document. After filling out the form, tap “Next” to proceed.
Step 5: Verify Your Identity
Choose your valid ID type from the available list. Globe accepts various identification documents, including:
- Passport
- Philippine National ID
- Driver’s License
- SSS ID
- UMID Card
- PhilHealth ID
- Senior Citizen ID
- Voter’s ID
- PRC ID
- Police Clearance
- NBI Clearance
- School ID or Student Registration Documents
- PWD Card
- GSIS e-Card
- Other government-approved IDs
After selecting your ID type, enter the required ID number and upload a clear photo of your valid ID for verification.
Step 6: Upload Selfie Verification
Take or upload a clear selfie photo to confirm that you are the rightful owner of the submitted identification document.
Step 7: Review and Submit Registration
Review all the details you entered and make sure your information and uploaded documents are correct. Check the box to agree to Globe’s Terms and Conditions, then tap Submit to complete your registration.
Step 8: Save Your Registration Confirmation
Once your Globe SIM registration is successful, you will receive a confirmation message or registration reference code. Keep this information for your records.
Congratulations! Your Globe SIM is now successfully registered and ready to use.
How to Check if Your Globe SIM Is Registered
If you’re not sure whether your Globe SIM has already been registered, there are several easy ways to verify its status. You can use the GlobeOne app, visit the official Globe SIM registration portal, or ask for assistance at a nearby Globe Store.
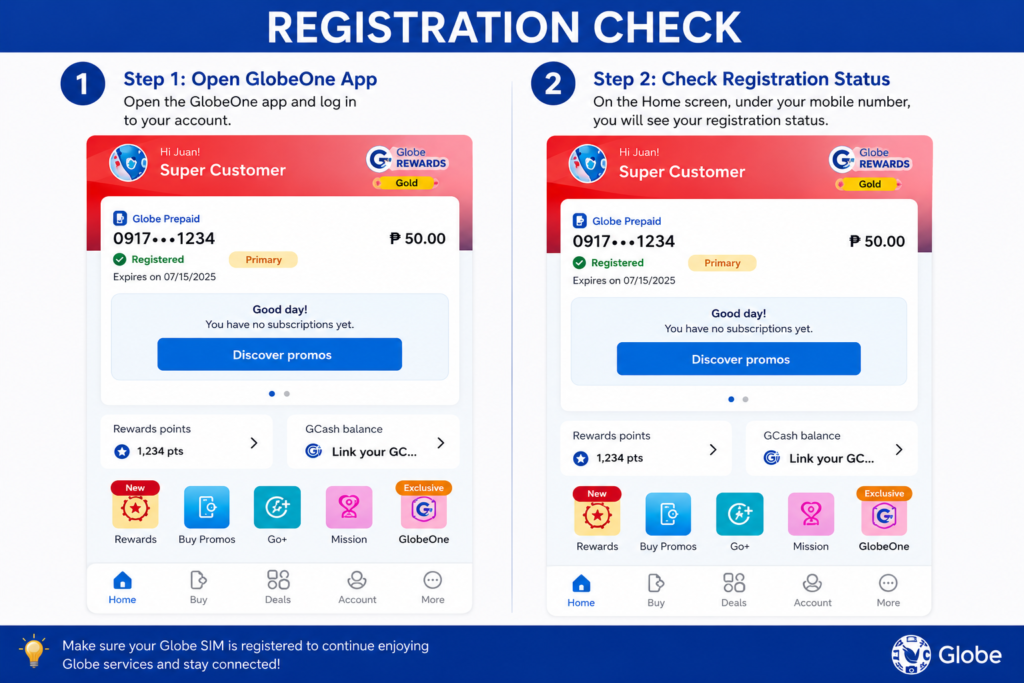
1. Check Through the GlobeOne App
Open the GlobeOne app and sign in using your Globe mobile number. On the home screen, look next to your registered phone number. If your SIM has been successfully registered, the app will display its registration status.
2. Verify Using the Globe SIM Registration Portal
Visit the official Globe SIM Registration Portal and enter your 10-digit Globe mobile number. An OTP (One-Time Password) will be sent to your phone for verification.
After entering the OTP, the system will check your registration status. If your SIM is already registered, you’ll see a confirmation message indicating that your registration has been completed successfully. If additional steps are required, simply follow the on-screen instructions.
3. Visit a Globe Store
You can also confirm your SIM registration status by visiting the nearest Globe Store. A customer service representative will assist you with the verification process.
Be prepared to provide the following information:
- Your full name
- Globe mobile number
- Valid government-issued ID
- Basic personal details for identity verification
Once your identity has been verified, the representative will let you know whether your Globe SIM is already registered or if further action is required.
Frequently Asked Questions (FAQs) – Globe SIM Registration
How do I complete Globe SIM registration online?
You can complete your Globe SIM registration online by visiting the official Globe SIM Registration portal or using the GlobeOne app. Enter your Globe mobile number, verify it with the OTP, provide your personal information, upload a valid ID and selfie, then submit your application.
Can I register my Globe SIM using the GlobeOne app?
Yes. The GlobeOne app allows you to register your Globe SIM quickly and securely. Simply log in, select Register Your SIM, and follow the on-screen instructions.
What documents are required for Globe SIM registration?
You’ll need a valid government-issued ID, your Globe mobile number, and a selfie for identity verification. Foreign nationals may need additional supporting documents depending on their residency status.
What happens if I don’t register my Globe SIM?
If your Globe SIM is not registered before the required deadline, it may be deactivated, preventing you from making calls, sending texts, using mobile data, or accessing other Globe services.
Can foreigners register a Globe SIM in the Philippines?
Yes. Foreign visitors and residents can register a Globe SIM by providing the required documents, such as a valid passport and other supporting identification based on their immigration status.